Customer accounts
By default, pretix only offers guest checkout, i.e. ticket buyers do not sign up and sign back in, but create a new checkout session every time. In some situations it may be convenient to allow ticket buyers to create accounts that they can later log in to again. Working with customer accounts is even required for some advanced use cases such as described in the Use case: Season tickets article.
Enabling customer accounts
To enable customer accounts, head to your organizer page in the backend and then select “Settings” → “General” → “Customer accounts” and turn on the checkbox “Allow customers to create accounts”.
Using the other settings on the same tab you can fine-tune how the customer account system behaves:
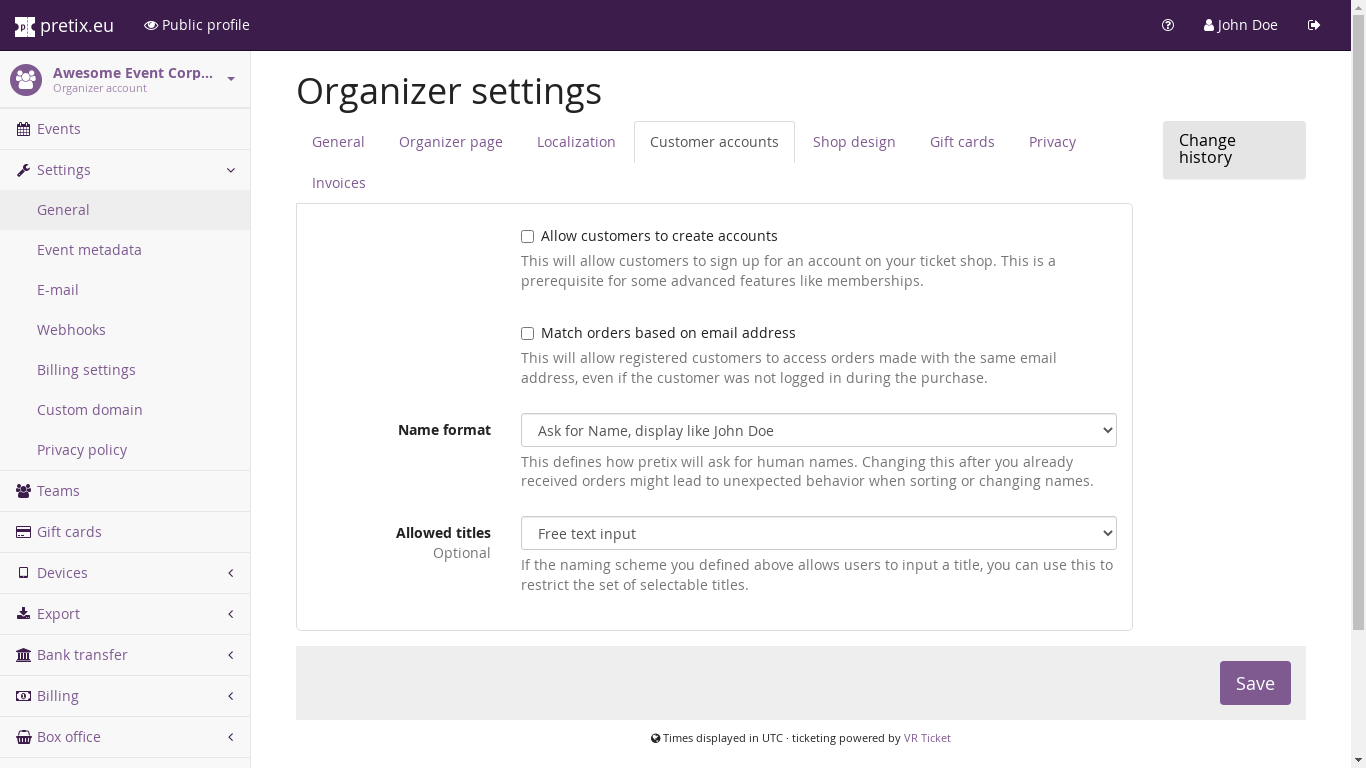
- Allow customers to log in with email address and password
In all simple setups, this option should be checked. If this checkbox is removed, it is impossible to log in or sign up unless you connect a SSO provider (see below).
- Match orders based on email address
If this option is selected, customers will see orders made with their email address within their account even if they did not make those orders while logged in.
- Name format, Allowed titles
This controls how we’ll ask your customers for their name, similar to the respective settings on event level.
Managing customer accounts
After customer accounts have been enabled, you will find a new menu option “Customer accounts” in the organizer-level main menu. The first sub-item, “Customers”, allows you to search and inspect the list of your customer accounts, as well as to create a new customer account from the backend:
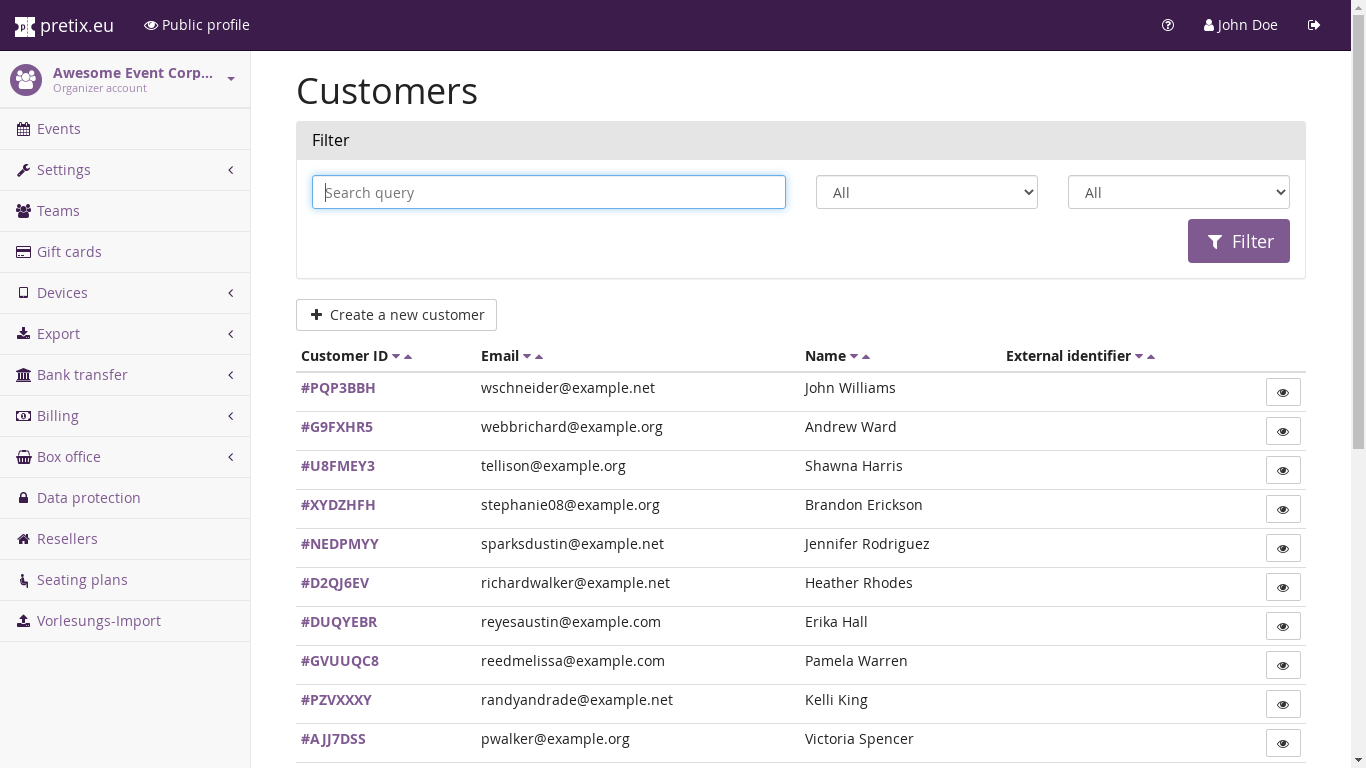
If you click on a customer ID, you can see all details of this customer account, including registration information, active memberships, past ticket orders, and account history:
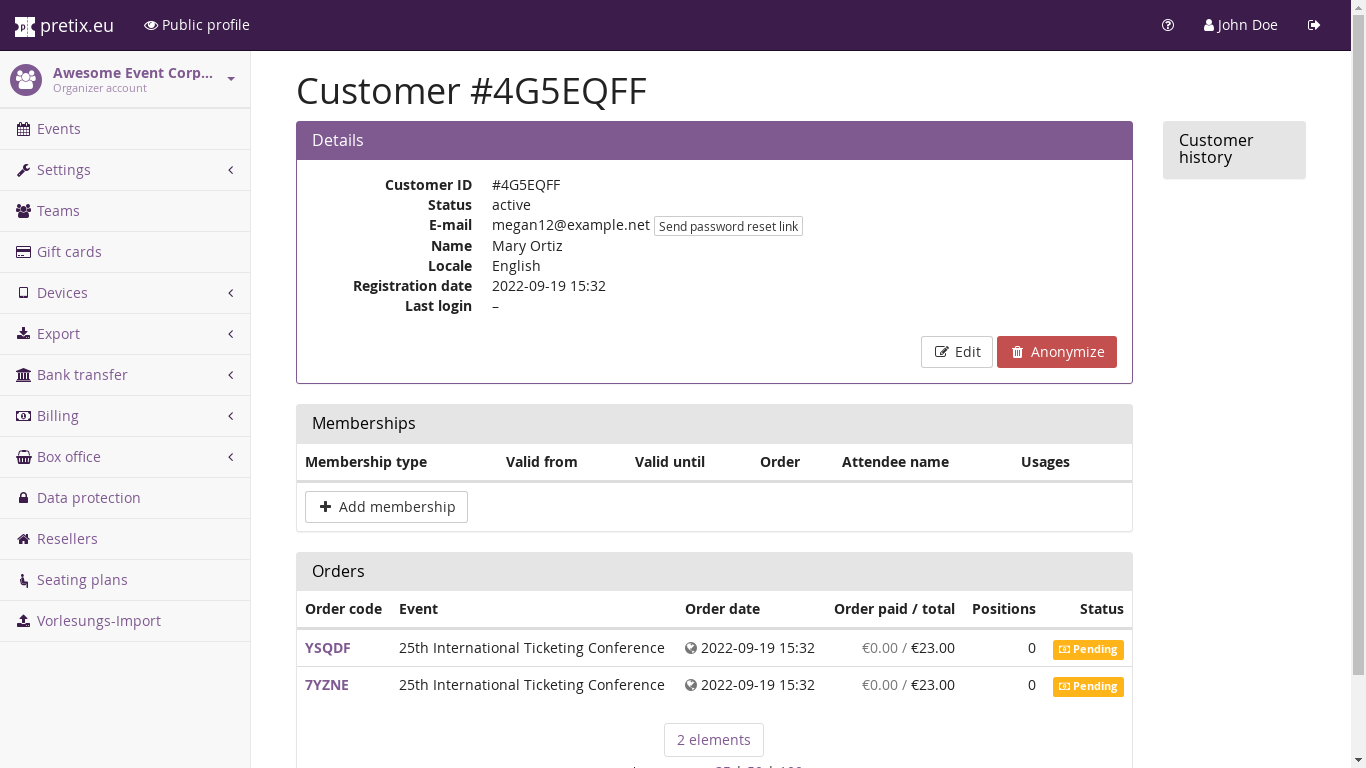
You can also perform various actions from this view, such as:
Send a password reset link
Change registration information
Anonymize the customer account (does not anonymize connected orders)
When creating or changing a customer, you will be presented with the following form:
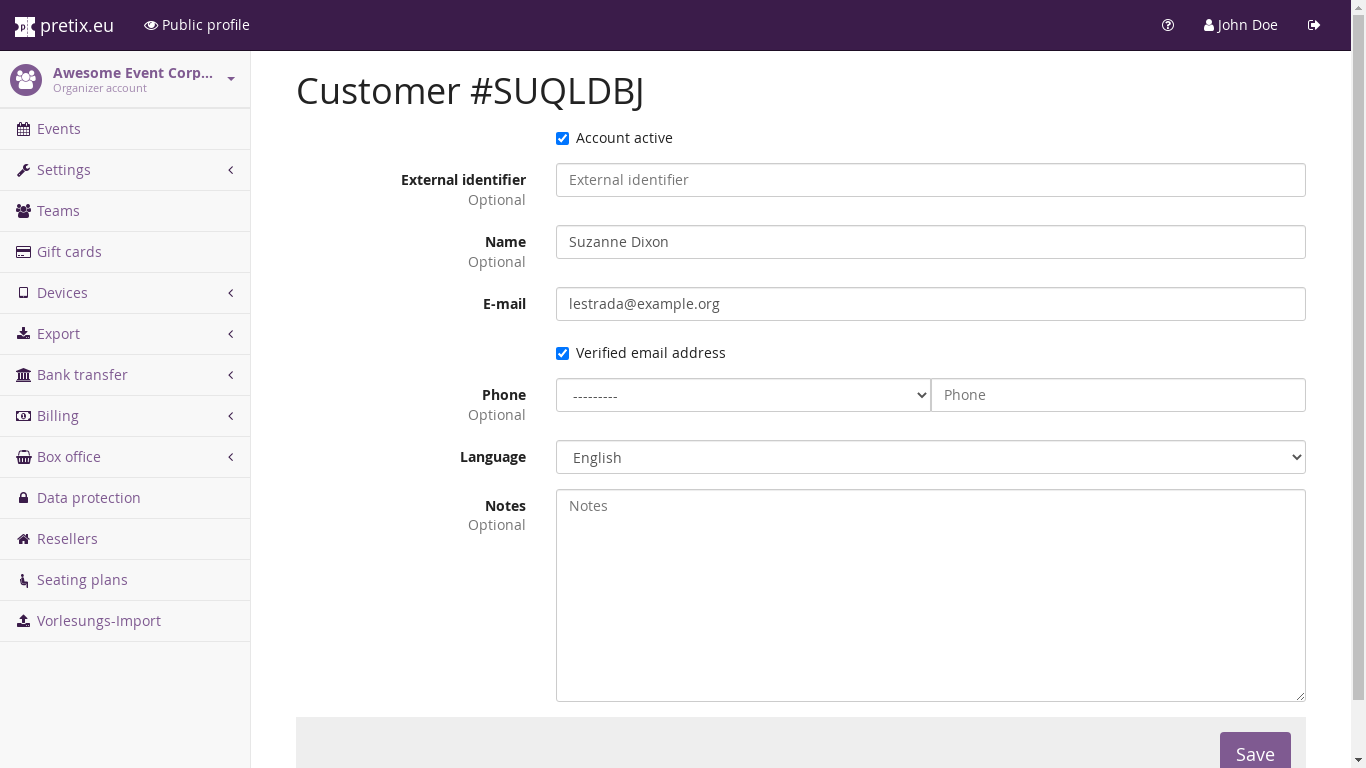
Most fields, such as name, e-mail address, phone number, and language should be self-explanatory. The following fields might require some explanation:
- Account active
If this checkbox is removed, the customer will not be able to log in.
- External identifier
This field can be used to cross-reference your customer database with other sources. For example, if the customer already has a number in another system, you can insert that number here. This can be especially powerful if you use our API for synchronization with an external system.
- Verified email address
This checkbox signifies whether you have verified that this customer in fact controls the given email address. This will automatically be checked after a successful registration or after a successful password reset. Before it is checked, the customer will not be able to log in. You should usually not modify this field manually.
- Notes
Entries in this field will only be visible to you and your team, not to the customer.
Single-Sign-On (SSO)
“Single-Sign-On” (SSO) is a technical term for a situation in which a person can log in to multiple systems using just one login. This can be convenient if you have multiple applications that are exposed to your customers: They won’t have to remember multiple passwords or understand how your application landscape is structured, they can just always log in with the same credentials whenever they see your brand.
In this scenario, pretix can be either the “SSO provider” or the “SSO client”. If pretix is the SSO provider, pretix will be the central source of truth for your customer accounts and your other applications can connect to pretix to use pretix’s login functionality. If pretix is the SSO client, one of your existing systems will be the source of truth for the customer accounts and pretix will use that system’s login functionality.
All SSO support for customer accounts in pretix is currently built on the OpenID Connect standard, a modern and widely accepted standard for SSO in all industries.
Connecting SSO clients (pretix as the SSO provider)
To connect an external application as a SSO client, go to “Customer accounts” → “SSO clients” → “Create a new SSO client” in your organizer account.
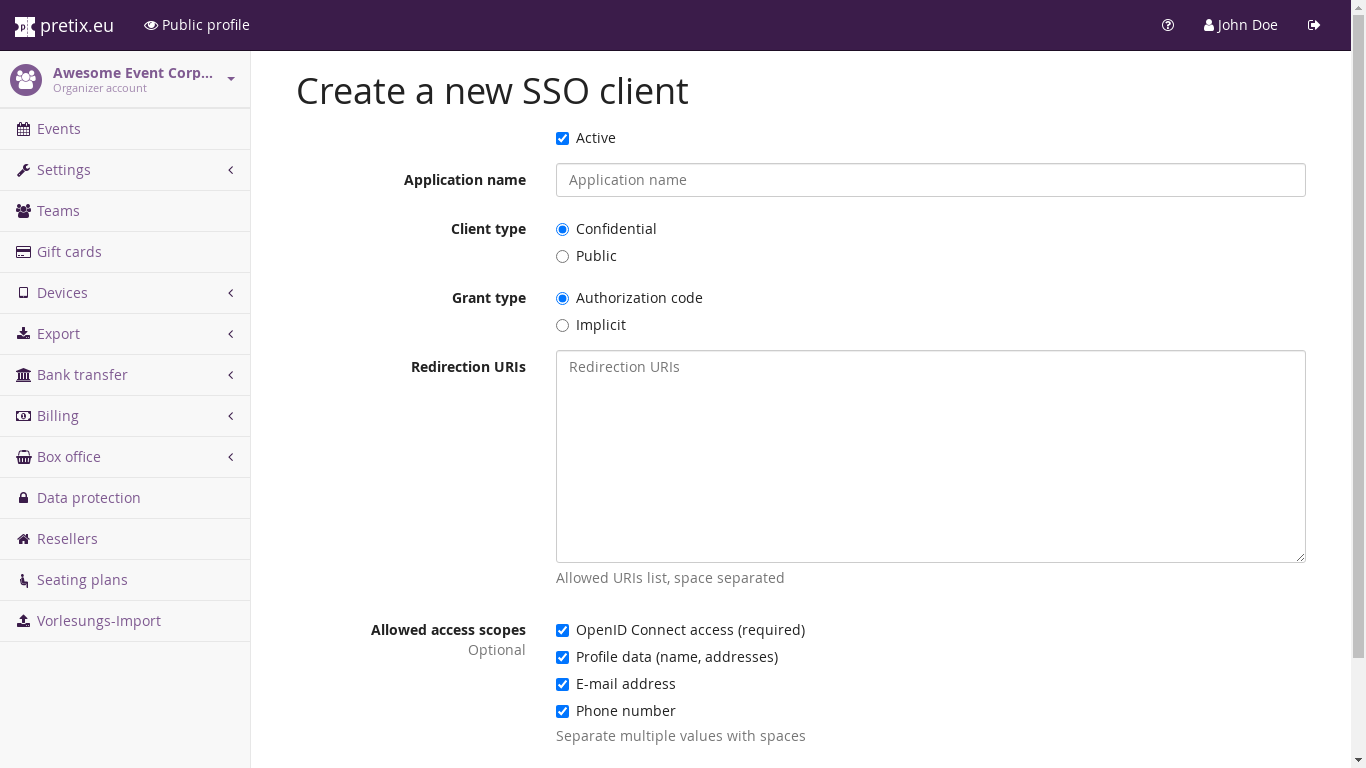
You will need to fill out the following fields:
- Active
If this checkbox is removed, the SSO client can not be used.
- Application name
The name of your external application, e.g. “digital event marketplace”.
- Client type
For a server-side application which is able to store a secret that will be inaccessible to end users, chose “confidential”. For a client-side application, such as many mobile apps, choose “public”.
- Grant type
This value depends on the OpenID Connect implementation of your software.
- Redirection URIs
One or multiple URIs that the user might be redirected to after the successful or failed login.
- Allowed access scopes
The types of data the SSO client may access about the customer.
After you submitted all data, you will receive a client ID as well as a client secret. The client secret is shown in the green success message and will only ever be shown once. If you need it again, use the option “Invalidate old client secret and generate a new one”.
You will need the client ID and client secret to configure your external application. The application will also likely
need some other information from you, such as your issuer URI. If you use pretix Hosted and your organizer account
does not have a custom domain, your issuer will be https://pretix.eu/myorgname, where myorgname is the short
form of your organizer account. If you use a custom domain, such as tickets.mycompany.net, then your issuer will be
https://tickets.mycompany.net.
Technical details
We implement OpenID Connect Core 1.0, except for some optional parts that do not make sense for pretix or bring no additional value. For example, we do not currently support encrypted tokens, offline access, refresh tokens, or passing request parameters as JWTs.
We implement the provider metadata section from OpenID Connect Discovery 1.0. You can find the endpoint relative
to the issuer URI as described above, for example http://pretix.eu/demo/.well-known/openid-configuration.
We implement all three OpenID Connect Core flows:
Authorization Code Flow (response type
code)Implicit Flow (response types
id_token tokenandid_token)Hybrid Flow (response types
code id_token,code id_token token, andcode token)
We implement the response modes query and fragment.
We currently offer the following scopes: openid, profile, email, phone
As well as the following standardized claims: iss, aud, exp, iat, auth_time, nonce, c_hash,
at_hash, sub, locale, name, given_name, family_name, middle_name, nickname, email,
email_verified, phone_number.
The various endpoints are located relative to the issuer URI as described above:
Authorization:
<issuer>/oauth2/v1/authorizeToken:
<issuer>/oauth2/v1/tokenUser info:
<issuer>/oauth2/v1/userinfoKeys:
<issuer>/oauth2/v1/keys
We currently do not reproduce their documentation here as they follow the OpenID Connect and OAuth specifications without any special behavior.
Connecting SSO providers (pretix as the SSO client)
To connect an external application as a SSO client, go to “Customer accounts” → “SSO providers” → “Create a new SSO provider” in your organizer account.
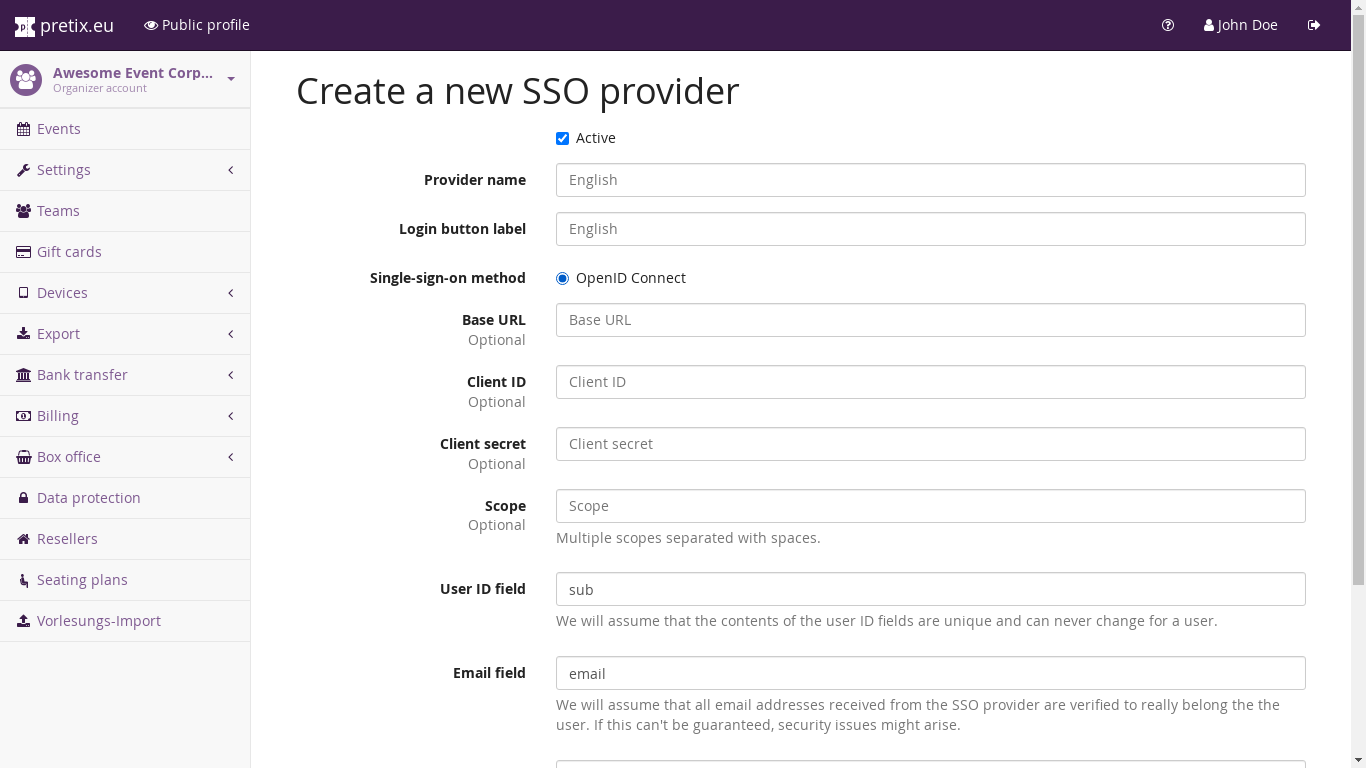
The “Provider name” and “Login button label” is what we’ll use to show the new login option to the user. For the actual connection, we will require information such as the issuer URL, client ID, client secret, scope, and field (or claim) names that you will receive from your SSO provider.
Note
If you want your customers to only use your SSO provider, it makes sense to turn off the “Allow customers to log in with email address and password” settings option (see above).
Technical details
We assume that SSO providers fulfill the following requirements:
Implementation according to OpenID Connect Core 1.0.
Published meta-data document at
<issuer>/.well-known/openid-configurationas specified in OpenID Connect Discovery 1.0.Support for Authorization code flow (
response_type=code) withresponse_mode=query.Support for client authentication using client ID and client secret and without public key cryptography.